Today, one of our readers has raised a query on forums about ‘How to create a Facebook Custom tab’?
Its an interesting question and facebook custom tab is demanded heavily by most of our clients. So, we decided to write a detailed post with all the required steps to enrich our readers and social media enthusiasts in our community.
What are Facebook Custom Tabs?
The undercover image on your fan page, you will find some default tabs like Photos, Events, Videos, and Notes, etc. But what if you want to have some custom information in such tabs? For example, we have provided a tab for ‘Recruitment’ from where candidates can apply for the job. Interesting, isn’t it?
We have developed a lot many such creative custom tabs for our clients for varied purposes like a restaurant menu, displaying teams, creating a video gallery, showing events, google maps and much more.
How to create Facebook Custom Tabs?
Before starting the development of Facebook pages, let’s understand how it functions. With the help of IFRAME tags, Facebook allows displaying the webpages inside the custom tabs. The only condition is that the web-pages should be hosted over SSL secured (https://) pages. For beginners, you can use the Hiroku hosting which is free. 🙂
Here in the given sample, we will see how to display a webpage on our custom tab. In this example, we will be displaying our own webpage which is on an SSL secured server.
Step 1: Login on Facebook Developers Account
Open developers.facebook.com. You need not be a geek or coder to log in here. Your routine Facebook login will serve the purpose.
Step 2: Create a New App
If you are creating it for the first time, click on ‘Create new app’ on top left-hand corner as shown in below image.

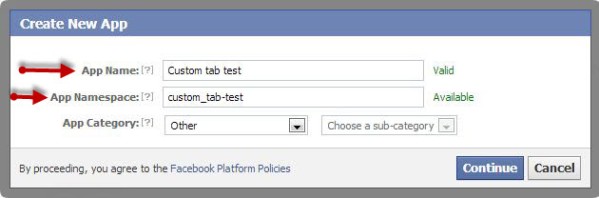
Step 3: Name your App
Based on the purpose of the app, you can give it the desired name. You will also be required to create a ‘Namespace’ which is nothing but a unique ID for your app. Just refer to the below image.
Step 4: Give your app info and upload app icon
Go to ‘Page Tab’ option and give the name to your page tab. You would be required to give the page tab url, which is the webpage which will be displayed via iframe. Please note in the below image that it’s essential to give the secure page tab URL as well. As mentioned above, it’s essential to have ssl secured webpage to create your facebook app. If you do not use ssl secured pages, your app may get displayed only on browsers where secure browsing is disabled.
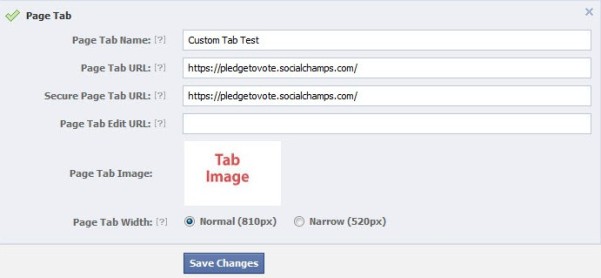
Now upload a custom image for your app icon. You must take it into consideration that this would be displayed prominently to your users and hence the image should be thoughtfully used. The required dimensions for this thumbnail image is 111×74 px.
Click on save changes and you are almost done. 🙂
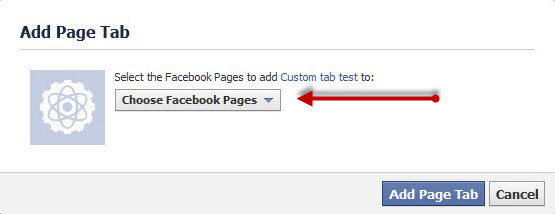
Step 5: Add your tab to your fan page
It’s the last and an easiest step. You simply need to replace the app ID and URL in the following link.
https://www.facebook.com/dialog/pagetab?app_id=YOUR_APP_ID&next=YOUR_URL
Copy the customized link and open in your browser. You will get an option to ‘Add tab to your page’ as given in below image.
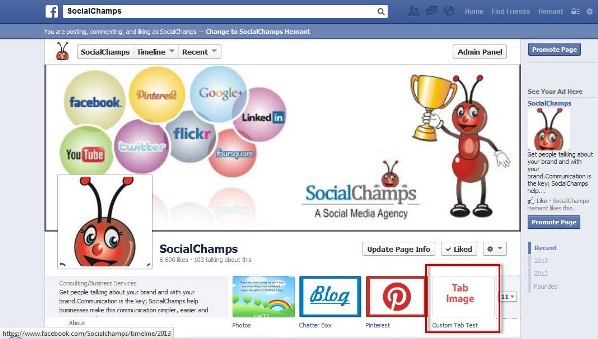
You should now see that a Custom tab is added to your page as shown in below image.
You can use Facebook Custom Tabs for varied purposes with lot of creativity.
Please feel free to discuss if you are facing any problems in creating custom tabs. We would love to answer your queries.
Image credits: Rucha

Leave a Reply