In the previous part of this series which is about social media advertising practices, we talked about the important points that should be considered before and while starting the Facebook advertising campaign.
We mentioned earlier that the advertising of Facebook is not free and the amount of money you need to spend depends on the number of days your ads would run for. When you are spending money you need to know and confirm that the ads are yielding the desired results.
So in this part of our series, we will talk about tracking the efficiency of ads and conversions that ads are leading to.
-
- Can the progress and efficiency of ads be tracked?Of course! It is your right to track as you are spending money on Facebook Ads. Following things can be done to track the efficiency and progress of Facebook Ads:
- Note down the time of maximum conversion:You should know which of the day and at what time, the rate of conversion is better. You might be surprised to know at a certain time in a day gives more conversion compared to the rest of the time period. Keep an eye once your ads start running and note the time when the conversion rates are higher. It would be better if you maintain an excel sheet for this.
-
- Measure your Facebook Ad ROI:It is said that you cannot measure Return on Investment (ROI) on Facebook. This is a myth. Fact is that measuring Facebook ROI is a difficult task but it is possible. You can measure the ROI of your Facebook advertising efforts, particularly when you’re looking to drive an action that can be assigned a value. This is done with conversion tracking and offsite pixels. Now we explain the key elements related to Facebook Ad ROI.
(i) Conversion tracking: Facebook allows you to track the conversions that happened as a result of the action that a Facebook user would take after clicking on your Facebook ad. When you ran your ad, your conversions went up 20%. But you need to know how many of those conversions were as a result of your ads? They could have been driven by something else. With conversion tracking, Facebook knows that they went to your website from your Facebook ad. And with the help of an offsite pixel, they know that the user then performed your desired action.
(ii) Offsite Pixel: An offsite pixel is a snippet of code provided by Facebook that you place within the < HEAD > tags of a specific page of your website to alert Facebook that a conversion is complete. For example, you are running an ad to drive the purchase of Widget 2.0. Facebook knows that a person clicked your ad. And they are able to follow that person away from Facebook as a result of you adding that snippet of code. You would add that offsite pixel to a success page. So once a user purchases Widget 2.0, they will be directed to a success page that holds your offsite pixel. Facebook then knows that your ad resulted in a successful conversion.
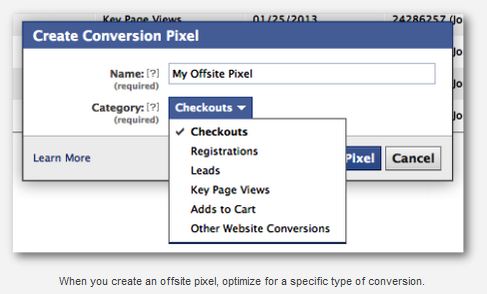
(iii) Conversion types and Optimized CPM: Facebook utilizes Optimized CPM (oCPM) to determine who sees your ads. CPM allows advertisers to prioritize their marketing goals. After that, it automatically delivers ads against those goals in the most effective way possible. This allows advertisers to maximize the value they get from their budgets. Your ad is optimized to be surfaced to the people most likely to perform your desired action. When you set up your offsite pixel, you can optimize for the conversion types like Checkouts, Registrations, Leads, Key page views, Adds to cart and other website conversions.
- Measure your Facebook Ad ROI:It is said that you cannot measure Return on Investment (ROI) on Facebook. This is a myth. Fact is that measuring Facebook ROI is a difficult task but it is possible. You can measure the ROI of your Facebook advertising efforts, particularly when you’re looking to drive an action that can be assigned a value. This is done with conversion tracking and offsite pixels. Now we explain the key elements related to Facebook Ad ROI.
Facebook learns which users perform any of these actions through advertisers using conversion tracking. This intelligence helps Facebook target your ad at people most likely to convert.
How to create offsite pixel?
The procedure to create offsite pixel is as follows:
STEP 1 – Open Power Editor:
Power editor is offered by Facebook. Open it and find the option of “Conversion Tracking” on the top-left menu. Click it.
![]()
If you have never used Conversion Tracking before, Facebook provides a nice little explanation for you.
![]()
After that, click the green “Create Conversion Pixel” button at the top right.
![]()
After that, name your pixel and choose a conversion category. This is the action that Facebook will optimize for.
![]()
STEP 2 – Snag The Code:
Now you will be given a box with some code. This is the offsite pixel! Copy this code.
![]()
STEP 3 – Paste The Code:
You will need to paste this code between the < HEAD > tags of a specific page on your website. How and where you do that will depend on a couple of things. The procedure to do this will be determined by your Content Management System (CMS). Within WordPress, you should have a text box for the Custom Tracking/Conversion Code when editing your page or post.
![]()
The page that you add this code to will depend on your desired action. Here are some examples of where you would add your offsite pixel:
Checkouts: The page indicating a completed checkout
Registrations: The page indicating a completed registration
Leads: The page following submitting a contact form
Key page views: The key page itself
Adds to cart: The page following Add to Cart
Other website conversions: The page following a specific conversion
STEP 4 – Verify the pixel:
Within your list of conversion pixels in Power Editor, the new pixel will either be listed as Active, Unverified or Inactive.
Active: In the past 24 hours, people have viewed the pages that contain the pixel on your website.
Unverified: Your pixel may not be installed or properly configured because there have been no reports of people viewing it on your website.
Inactive: In the past 24 hours, nobody has viewed the pages that contain the pixel on your website.
![]()
Make sure you refresh the page of your website after you add the pixel to it. That will send a signal to Facebook that it is active. If the status continues to be Unverified, you need to go back and check whether you followed the steps correctly.
STEP 5 – Create your Ad:
When you create an ad within Power Editor to drive conversions for this pixel, you will now need to apply your offsite pixel.
![]()
Within the “Creative & Placements” tab, click the “Conversion Tracking” checkbox and select your pixel.
STEP 6 – Monitor your conversions:
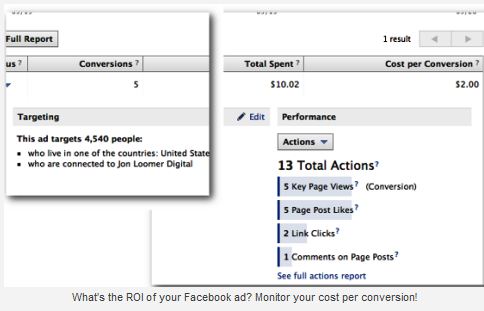
After all the steps, now when you go into the Facebook Ads Manager, you will be given the following stats:
Conversions: The number of times your conversion pixels fired
Conversion Value: The value that your ad returned to you based on the conversion details you set up (if available)
Cost Per Conversion: The average you paid for each conversion
If you know the value of each conversion, you can now determine the ROI of your ad campaign!
Hence, now you know how you can monitor your Facebook ads and decide whether they are worth your money. If you find it difficult to understand something related to this procedure, post your comments and feel free to ask us questions.
In our next part of this series, we will talk about LinkedIn Ads.

Leave a Reply